
This cake is great not only for a birthday, but also just for a holiday party! And a really fun aspect about this cake is that your friends can grab candy from the top to enjoy while the cake is being cut!
My twins had their birthday this month and for their party they just wanted to have our family over and build gingerbread houses! So of course for the cake I wanted it to be inspired by the activity! I went to Pinterest for Inspiration:

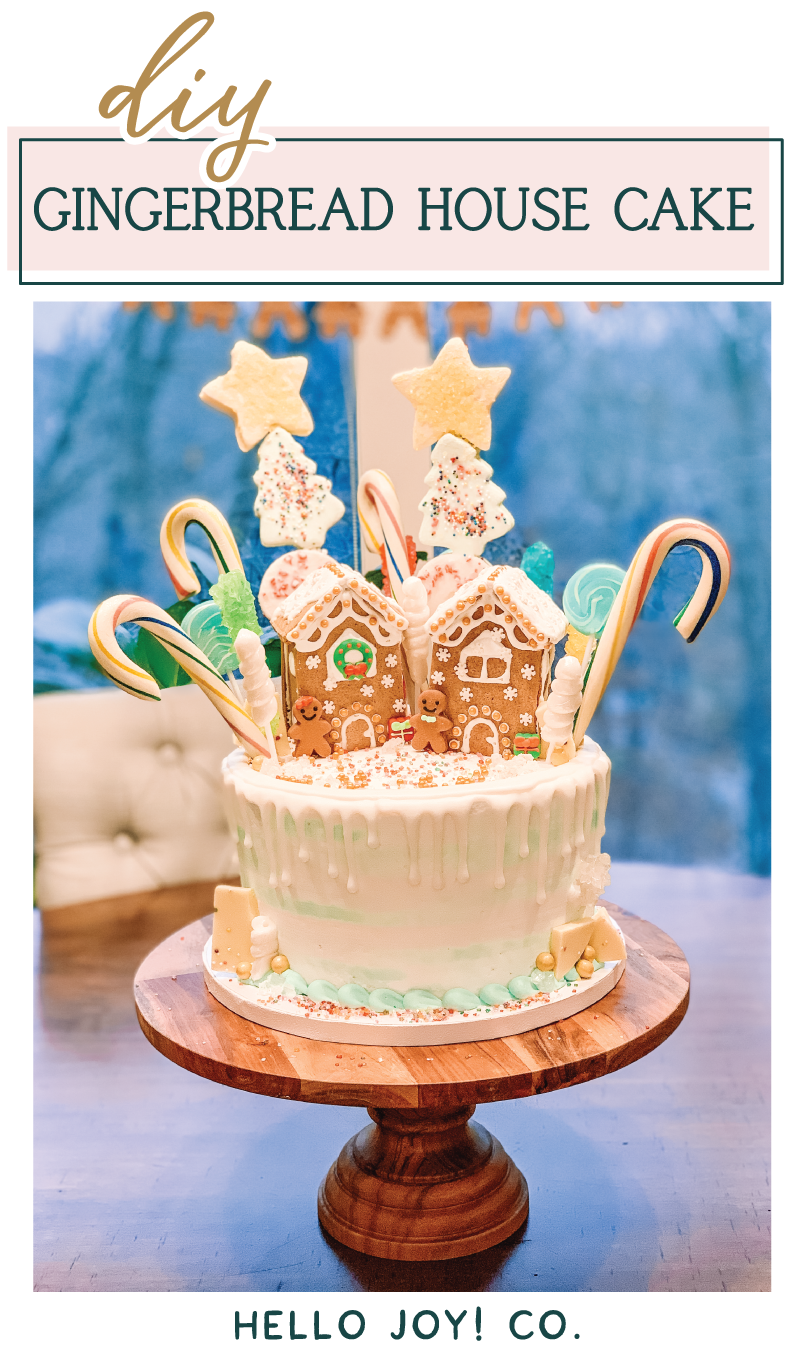
I loved this cake from Cakes Decor! I just needed it to have 2 houses since this was for my 9 year old twins! 
Here's the DIY part...
For the Cake: I'm not the best baker so I hired the cake out at Hy-Vee Grocery! We typically go to them for all of our cakes (even our wedding cake 12 years ago!). We did a double layer 8" round vanilla flavor cake with buttercream frosting. I had them make the base with a light teal color for the unfinished side of the cake and then the did the white on top with drips down like in the photo.
For the Gingerbread Houses: I made the 2 mini gingerbread houses from a kit I got at Party City a day or 2 before the party. I used the icing that came in the kits for glueing the houses together & then I got a different white icing for decorating the houses. Use some of the sprinkles on the house that you got to decorate the cake with. FYI, they can take time to decorate. 

For the Candy & Sprinkles: Then right before the party you get to decorate! Don't do it too early because you will want to leave the cake in the cool fridge for as long as you can. That's what the baker said, I think it was because the icing is buttercream and it would get soft. Just start assembling everything on top of your cake! I started with the gingerbread houses and placed them where I wanted them. Then, I added the Marshmallow Kabob (with the star, tree & candy cane). Next, I went placed the candy canes where I wanted them. (Just so you know if they are thick like mine don't put them in the top of the cake too close to the edge or it will fall off the cake taking a chunk of the cake with it...that may have happened to me! ;) Live and learn!) The rock candy & lollipops are next. Place them where ever you want! Just intermix them with the other items you already have on the top. I also decorated it around the back of the houses too. For the rock candy I cut the round wooden ball off the bottom of the stick so that it didn't create too big of a hole when you put it into the top of the cake. I had white chocolate bark that I broke apart and placed on the cake upright. I put them by the houses and at the base of the cake. Now it is time for the sprinkles! I had a lot of gold since it was my twins "golden" birthday! I just put them around the cake. You could start with your largest sprinkles first and then add the other ones you want. I had a colorful sprinkle that I added on the top of the cake in front of the houses and around the base of the cake on the stand that came from the bakery. For decorating the base of the cake just add in some lollipops, bark, sprinkles however you would like. Keep it subtle or go all out! There's no wrong way! I also bought battery operated lights to put around the bottom of the cake! 
 So here is a link to all the items you will need for this DIY!
Mini Gingerbread House Gingerbread Men with Presents & Wreath Twirly Lollipops Twisty Lollipops Rock Candy Sticks Large Sprinkles (Sixlets) Pearl Sprinkles Holiday Sprinkles Candles if it's for a Birthday These items I got at Target in the Christmas section: White Chocolate Bark Marshmallow Skewers Large Candy Canes
And just incase anyone wanted to know where my Wood Cake Stand was from I got it at Target in the Hearth & Hand with Magnolia Collection.
And if you wanted to see how the Gingerbread houses turned out for the kids here is a slideshow!
